What is Android?
Android is an open source and Linux-based Operating System for mobile devices such as smartphones and tablet computers. Android was developed by the Open Handset Alliance, led by Google, and other companies.
Android offers a unified approach to application development for mobile devices which means developers need only develop for Android, and their applications should be able to run on different devices powered by Android.
The first beta version of the Android Software Development Kit (SDK) was released by Google in 2007 where as the first commercial version, Android 1.0, was released in September 2008.
On June 27, 2012, at the Google I/O conference, Google announced the next Android version, 4.1 Jelly Bean. Jelly Bean is an incremental update, with the primary aim of improving the user interface, both in terms of functionality and performance.
The source code for Android is available under free and open source software licenses. Google publishes most of the code under the Apache License version 2.0 and the rest, Linux kernel changes, under the GNU General Public License version 2.
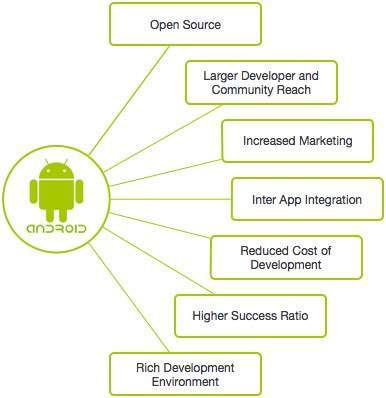
Why Android ?
Android - Environment Setup
You will be glad to know that you can start your Android application development on either of the following operating systems −
- Microsoft Windows XP or later version.
- Mac OS X 10.5.8 or later version with Intel chip.
- Linux including GNU C Library 2.7 or later.
Second point is that all the required tools to develop Android applications are freely available and can be downloaded from the Web. Following is the list of software's you will need before you start your Android application programming.
- Java JDK5 or later version
- Android Studio
Here last two components are optional and if you are working on Windows machine then these components make your life easy while doing Java based application development. So let us have a look how to proceed to set required environment.
Set-up Java Development Kit (JDK)
You can download the latest version of Java JDK from Oracle's Java site − Java SE Downloads. You will find instructions for installing JDK in downloaded files, follow the given instructions to install and configure the setup. Finally set PATH and JAVA_HOME environment variables to refer to the directory that contains java and javac, typically java_install_dir/bin and java_install_dir respectively.
If you are running Windows and installed the JDK in C:\jdk1.8.0_102, you would have to put the following line in your C:\autoexec.bat file.
Android IDEs
There are so many sophisticated Technologies are available to develop android applications, the familiar technologies, which are predominantly using tools as follows
Android operating system is a stack of software components which is roughly divided into five sections and four main layers as shown below in the architecture diagram.
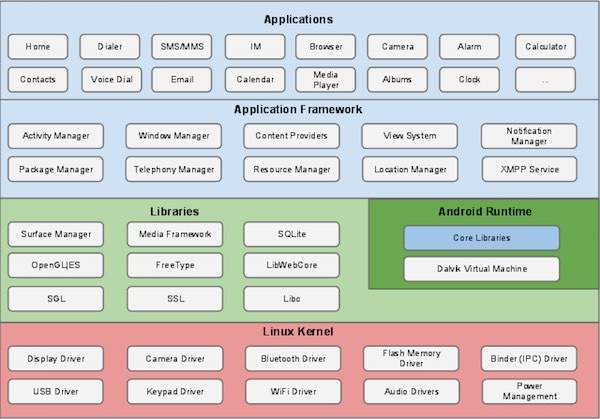
Linux kernel
At the bottom of the layers is Linux - Linux 3.6 with approximately 115 patches. This provides a level of abstraction between the device hardware and it contains all the essential hardware drivers like camera, keypad, display etc. Also, the kernel handles all the things that Linux is really good at such as networking and a vast array of device drivers, which take the pain out of interfacing to peripheral hardware.
Libraries
On top of Linux kernel there is a set of libraries including open-source Web browser engine WebKit, well known library libc, SQLite database which is a useful repository for storage and sharing of application data, libraries to play and record audio and video, SSL libraries responsible for Internet security etc.
Android Libraries
This category encompasses those Java-based libraries that are specific to Android development. Examples of libraries in this category include the application framework libraries in addition to those that facilitate user interface building, graphics drawing and database access. A summary of some key core Android libraries available to the Android developer is as follows −
- android.app − Provides access to the application model and is the cornerstone of all Android applications.
- android.content − Facilitates content access, publishing and messaging between applications and application components.
- android.database − Used to access data published by content providers and includes SQLite database management classes.
- android.opengl − A Java interface to the OpenGL ES 3D graphics rendering API.
- android.os − Provides applications with access to standard operating system services including messages, system services and inter-process communication.
- android.text − Used to render and manipulate text on a device display.
- android.view − The fundamental building blocks of application user interfaces.
- android.widget − A rich collection of pre-built user interface components such as buttons, labels, list views, layout managers, radio buttons etc.
- android.webkit − A set of classes intended to allow web-browsing capabilities to be built into applications.
Having covered the Java-based core libraries in the Android runtime, it is now time to turn our attention to the C/C++ based libraries contained in this layer of the Android software stack.
Android Runtime
This is the third section of the architecture and available on the second layer from the bottom. This section provides a key component called Dalvik Virtual Machine which is a kind of Java Virtual Machine specially designed and optimized for Android.
The Dalvik VM makes use of Linux core features like memory management and multi-threading, which is intrinsic in the Java language. The Dalvik VM enables every Android application to run in its own process, with its own instance of the Dalvik virtual machine.
The Android runtime also provides a set of core libraries which enable Android application developers to write Android applications using standard Java programming language.
Application Framework
The Application Framework layer provides many higher-level services to applications in the form of Java classes. Application developers are allowed to make use of these services in their applications.
The Android framework includes the following key services −
- Activity Manager − Controls all aspects of the application lifecycle and activity stack.
- Content Providers − Allows applications to publish and share data with other applications.
- Resource Manager − Provides access to non-code embedded resources such as strings, color settings and user interface layouts.
- Notifications Manager − Allows applications to display alerts and notifications to the user.
- View System − An extensible set of views used to create application user interfaces.
- Let us start actual programming with Android Framework. Before you start writing your first example using Android SDK, you have to make sure that you have set-up your Android development environment properly as explained in Android - Environment Set-up tutorial. I also assume that you have a little bit working knowledge with Android studio.So let us proceed to write a simple Android Application which will print "Hello World!".
Create Android Application
The first step is to create a simple Android Application using Android studio. When you click on Android studio icon, it will show screen as shown below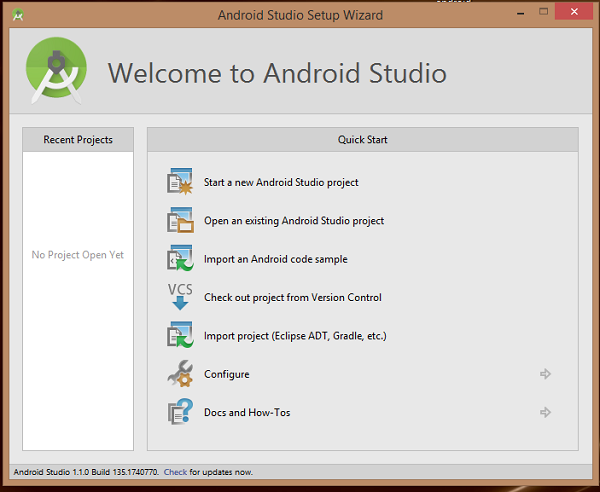 You can start your application development by calling start a new android studio project. in a new installation frame should ask Application name, package information and location of the project.−
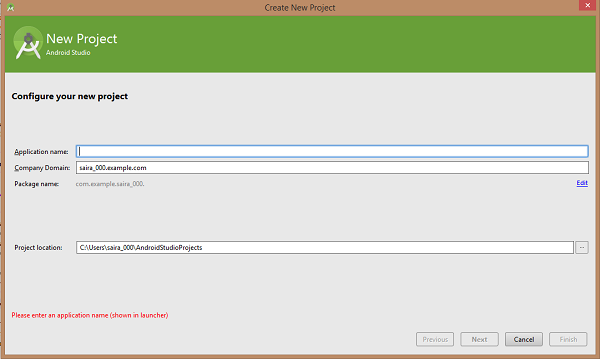 After entered application name, it going to be called select the form factors your application runs on, here need to specify Minimum SDK, in our tutorial, I have declared as API23: Android 6.0(Mashmallow) −
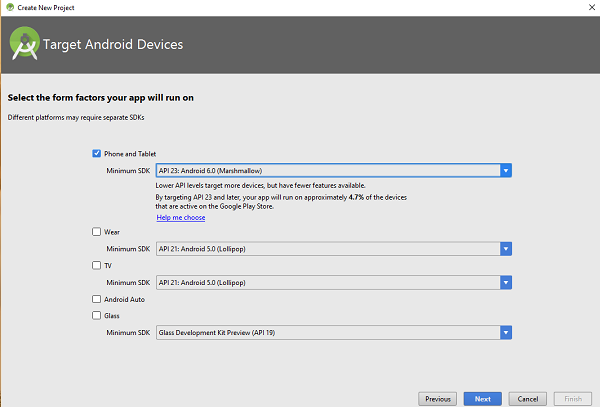 The next level of installation should contain selecting the activity to mobile, it specifies the default layout for Applications.
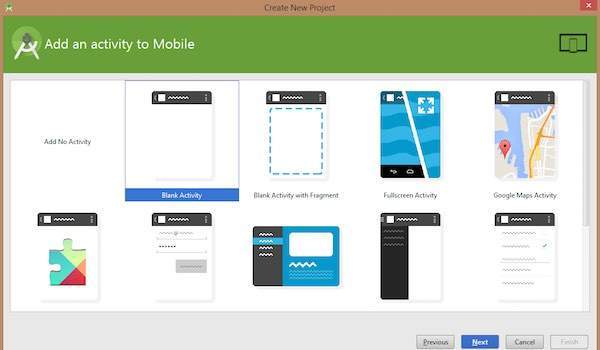 At the final stage it going to be open development tool to write the application code.
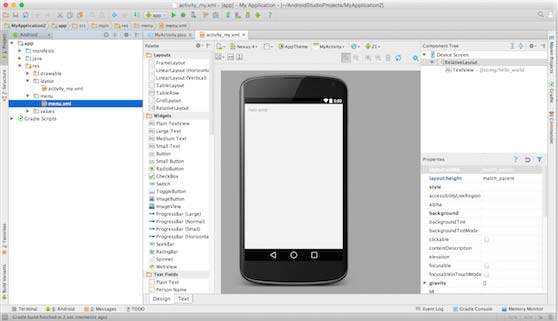
Anatomy of Android Application
Before you run your app, you should be aware of a few directories and files in the Android project −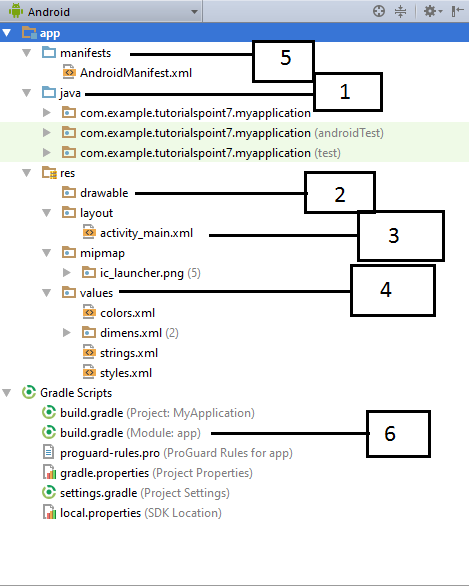
- Activities
- If you have worked with C, C++ or Java programming language then you must have seen that your program starts from main() function. Very similar way, Android system initiates its program with in an Activity starting with a call on onCreate() callback method. There is a sequence of callback methods that start up an activity and a sequence of callback methods that tear down an activity as shown in the below Activity life cycle diagram: (image courtesy : android.com )
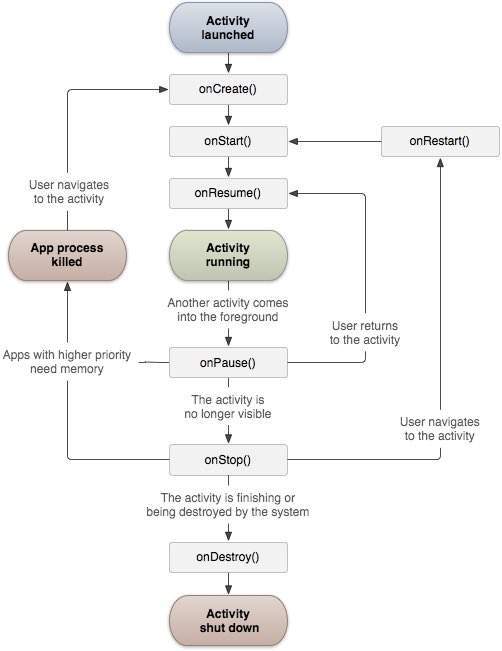 The Activity class defines the following call backs i.e. events. You don't need to implement all the callbacks methods. However, it's important that you understand each one and implement those that ensure your app behaves the way users expect.
 - Service
- A service is a component that runs in the background to perform long-running operations without needing to interact with the user and it works even if application is destroyed. A service can essentially take two states .
Broadcast Receivers
- Broadcast Receivers simply respond to broadcast messages from other applications or from the system itself. These messages are sometime called events or intents. For example, applications can also initiate broadcasts to let other applications know that some data has been downloaded to the device and is available for them to use, so this is broadcast receiver who will intercept this communication and will initiate appropriate action.
Content Providers
A content provider component supplies data from one application to others on request. Such requests are handled by the methods of the ContentResolver class. A content provider can use different ways to store its data and the data can be stored in a database, in files, or even over a network.
Content providers let you centralize content in one place and have many different applications access it as needed. A content provider behaves very much like a database where you can query it, edit its content, as well as add or delete content using insert(), update(), delete(), and query() methods. In most cases this data is stored in an SQlite database.
A content provider is implemented as a subclass of ContentProvider class and must implement a standard set of APIs that enable other applications to perform transactions.
- Create Content ProviderThis involves number of simple steps to create your own content provider.First of all you need to create a Content Provider class that extends the ContentProviderbaseclass.Second, you need to define your content provider URI address which will be used to access the content.Next you will need to create your own database to keep the content. Usually, Android uses SQLite database and framework needs to override onCreate() method which will use SQLite Open Helper method to create or open the provider's database. When your application is launched, the onCreate() handler of each of its Content Providers is called on the main application thread.Next you will have to implement Content Provider queries to perform different database specific operations.Finally register your Content Provider in your activity file using <provider> tag.Here is the list of methods which you need to override in Content Provider class to have your Content Provider working −content providerCONTENTPROVIDERonCreate() This method is called when the provider is started.query() This method receives a request from a client. The result is returned as a Cursor object.insert()This method inserts a new record into the content provider.delete() This method deletes an existing record from the content provider.update() This method updates an existing record from the content provider.getType() This method returns the MIME type of the data at the given URI.
Intents and Filters
An Android Intent is an abstract description of an operation to be performed. It can be used with startActivity to launch an Activity, broadcastIntent to send it to any interested BroadcastReceiver components, and startService(Intent) or bindService(Intent, ServiceConnection, int) to communicate with a background Service.
Intent Objects
An Intent object is a bundle of information which is used by the component that receives the intent as well as information used by the Android system.
An Intent object can contain the following components based on what it is communicating or going to perform −
Action
This is mandatory part of the Intent object and is a string naming the action to be performed — or, in the case of broadcast intents, the action that took place and is being reported. The action largely determines how the rest of the intent object is structured . The Intent class defines a number of action constants corresponding to different intents. Here is a list of Android Intent Standard Actions
The action in an Intent object can be set by the setAction() method and read by getAction().
Data
Adds a data specification to an intent filter. The specification can be just a data type (the mimeType attribute), just a URI, or both a data type and a URI. A URI is specified by separate attributes for each of its parts −
These attributes that specify the URL format are optional, but also mutually dependent −
- If a scheme is not specified for the intent filter, all the other URI attributes are ignored.
- If a host is not specified for the filter, the port attribute and all the path attributes are ignored.
The setData() method specifies data only as a URI, setType() specifies it only as a MIME type, and setDataAndType() specifies it as both a URI and a MIME type. The URI is read by getData() and the type by getType().
Applications
You will find all the Android application at the top layer. You will write your application to be installed on this layer only. Examples of such applications are Contacts Books, Browser, Games etc.
MP3 player
Linear Layout
Install and setup genymotion for Android Studio
Services
No comments:
Post a Comment